Wednesday, July 15, 2009

How to: French Manicure

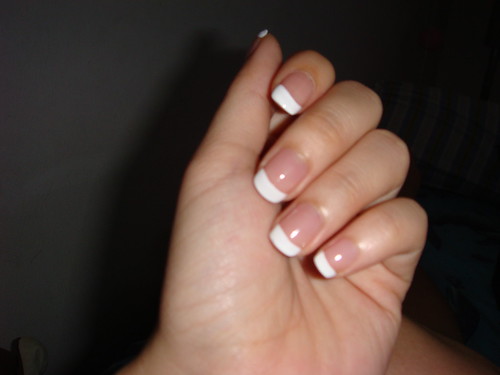
French manicures are always in style, giving a chic and feminine look. Here's how to get the perfect french manicure:

manicure photoSTEP 1
It's essential to prepare your hands and nails before applying
nail polish. First, exfoliate your hands by massaging them using a small amount of body scrub. Rinse with water and dry thoroughly. One of the main causes of chapped hands is not drying them properly after washing.


manicure photoSTEP 2
File your
nails. If they are brittle or tend to split, keep them flat across the top with smooth, rounded edges. When filing, move in one direction, from outer corner to centre-sawing movements can damage the nail plate. Choose a nail file with a fine surface that glides over the nail.


manicure photoSTEP 3
Coat hands in a layer of sweet almond oil, to norish and soften, then wrap in a warm towel and relax for 15 minutes. Unwrap, and gently push back cuticles using a rubber hoof stick (available from most chemists). Never use cuticle clippers, as they can nick the skin. Rinse hands with warm water and dry thoroughly to remove any oil residue.

manicure photoSTEP 4
Apply one coat of base coat over your entire nail and allow a couple of minutes to dry. This will help strengthen the nail. Some products also level fine ridges and imperfections, leaving a smooth surface to apply polish. There's a wide range of base coats to choose from.


manicure photoSTEP 5
For a square look, paint a straight line across the tips; for a rounded appearance, follow the curve of the nail; and to get a pointed style, paint in from each side to the centre. Some manicure kits include sticky strips to use as a guide. when applying, lay your hand on a flat surface and keep the ball of your painting hand steady and keep the ball of your painting hand steady by resting it on the same surface. Leave to dry.

manicure photoSTEP 6
Finally, apply a coat of translucent shell-pink
nail polish over the entire nail to seal the whitened tip and complete the look. Allow 10 minutes for it to dry. For extra shine and protection, apply a clear, glossy top coat.


Friday, June 26, 2009

My beauty survival kit:


These are some essential items that I carry around in my beauty-survival kit:

-Chapstick
-Dental floss
-Hairspray
-Perfume tester
-Tissue
-Pressed powder
-Visine
-Mini bottle lotion (Body shop Vanilla)


All these are in case of beauty emergencies, ofcourse I have a seperate makeup bag with makeup too.

xoxo

Spotted: Hair trends of Summer 09


Dearly beloved,

Brace yourselves for the one hair trend that has been circling all of Hollywood, perfect for summer...

Yes, the braid.


It's low maintenance, and ability to keep the hair off the face, makes it the number one trend of this summer.

Many celebrities, such as Nicole Richie and Lauren Conrad have been seen with this hairdo, so do not fear, the braid is here.


Enjoy xoxo

IN/OUT

This week's in/out:

IN
Shop refunds
Summer tans
Lemonades by the pool
Mix n' match bikinis
Bronze eyeshadow

OUT
Heavy makeup
Black nail polish (in with the bright, summer colors)
Streaky, orange tans
Staying in on a Friday night

How to have great skin

Bad looking, pimple covered skin is a huge turn off, so naturally, we all desire healthy-looking skin. But just how easy is it to get good looking skin?

Well one major aspect is to make sure that the natural oils in our skin are not clogged; because this is how pimples and other blemishes form. There are several ways to do this:
1) Drink plenty of water as it purges toxins and hydrates the skin
2) Eat leafy greens - they clear skin by containing antioxidants
3) Eat lots of berries and drink flax seed oil


Also, a great mask for clearing skin, is the infamous "Aspirin Mask".
How to make an aspirin mask:
-Mix one uncoated aspirin with three tablespoons of water
-Add a large teaspoon of honey into this, and mix well
-Apply to the skin and leave it for 10 minutes (I usually do the dishes whilst waiting)

Results can be seen even after the first application! The reason the Aspirin Mask is so helpful is because aspirin rids the skin of pimples and honey is antibacterial, creating a perfect combination.

So there you have it, now you're a step closer to perfect skin :)


Goodbye :) xoxo

I'ts time for a tan! :)


Now that it's officially summer, it's time to get our tans on, ladies. (and gents)

One major problem though is our good friend (or is it an enemy?), the sun. When exposed directly to the sun during the hours of 11 - 2, we may develop cancerous cells which are extremely dangerous for our health.

So one major sun tip is:
*Avoid the sun from 11 -2
No amount of protection will help, we simply have to just avoid it at those crucial hours.

A tip for a faster tan, is to:
*Use tanning oil with an SPF factor in it
Make sure you have a high SPF in the oil, 15 and onwards, to protect from harmful UVA and UVB rays.

Also, make sure to:
*Change your sunscreen every year
Do not attempt to "save money" by using the same sunscreen/sun block every year, it eventually stops working and will not protect your skin.

If you want an even tan, make sure to:
*Exfoliate well before tanning
This will rid your skin of any dead skin cells on your skin, and your tan will be more even. Focus more on areas which are drier such as the knees and elbows, since they tend to be alot darker than other parts of our bodies.

My final tips is to:
*Stay out no longer than 45 minutes without a break
Every 45 minutes or so, take a break and go inside to give your body time to cool down for 5 minutes, before going back out under the sun. Drink plenty of water to keep your skin hydrated.


So then, ladies, those are my main tips for a tan this summer, so now it's time to get our tan on.


Have a lovely day xoxo

Thursday, June 25, 2009

Tip of the week

I've decided to start a "tip of the week" segment which I will post once a week (no duh).

So here we go, this week my tip is:

-Fill in your brows

Do not be afraid to fill in your brows with an eyeshadow a shade darker than their natural color. This will define your eyes more and bring your look together to 'complete' it.

At first I was a tad afraid I must admit, since my theory was that darker eyebrows make you look too stern and serious. Then when I tried it, it definitely made a difference in a positive light, and all the attention was drawn to my eyes.

Since then, I have never left the house without filling those two sista's in :)

Farewell xoxo

First Post


Date : 25th June 2009
Time: 9:11
Place: Mon' comfy bed :)

Oh the irony; I was inspired to start a beauty blog by the worst foundation in the world, And what foundation may that be, Lorraine, you ask?
"The Body Shop Oil Free Balancing Foundation, SPF 15" I answer. I cringe at the sound of it.

Don't get me wrong though, I am a huge Body Shop fan. I worship their numerous lotions, shower gels and body butters, and have a whole closet stashed with them.

But then, the deadly morning of the 24th of June (yes,yesterday), I decided to be daring, and try their makeup products.
I headed straight towards their foundation since I was in need of one (Max Factor's Lasting Power was a fail but that's another story for another day) and so the Oil Free Balancing Foundation SPF 15 caught my attention. I liked the sound of "oil-free" since my skin is terribly oily and needed to be nourished, and the SPF 15 seemed perfect for protection from the sun this summer. I chose the shade 02, which seemed to match my skin tone while I tested it out in the shop.

It was 14GBP (23 dollars), a fairly reasonable sum of money that I was willing to let go of to a company that has served me well for the past decade.

So then I got home, and immediately scrambled to the mirror. A pea sized amount of it fell onto my hand after pushing the top of the lid, and, using a foundation brush, I applied it to my face. From a normal woman I turned into an oompa-loompa. My skin turned orange and the product was streaky, but to add to this, it also added a greasy layer to my skin! I thought of switching this for a different shade, but what's the point of having a foundation that will lay greasily onto your skin?

Today morning, I happily returned to The Body Shop and swapped this horrible foundation for my usual body lotion (almond).

Moral of the story: never buy The Body Shop Oil Free Foundation SPF 15, and never attempt to be daring.

Now time to catch some well needed beauty sleep.

Goodnight xoxo